メニュー
メニューを構築する時に使うのが、JMenuBar 、JMenu 、
JMenuItem クラスで、メニューバー 、
それに入れるメニュー 、
そのメニュー内に並べるメニュー項目 です。
詳細は次のリンクで調べましょう。
java.lang.Object
 └java.awt.Component
  └java.awt.Container
   └ javax.swing.JComponent
    └javax.swing.JMenuBar
java.lang.Object
 └java.awt.Component
  └java.awt.Container
   └javax.swing.JComponent
    └javax.swing.AbstractButton
     └javax.swing.JMenuItem
      └javax.swing.JMenu
基本的なメニュー構成
←次のプログラムを確認するボタンです。
package test;
import java.awt.*;
import javax.swing.*;
import java.awt.event.*;
public class TestMenuFrame extends JFrame implements ActionListener
{
java.awt.Container container;// Frameに入れる入れ物取得
JLabel lbl1 = new JLabel("初期ラベル表示");
String fontFamily = "Serif";//ラベルのフォントで使う論理フォント名
int fontStyle = Font.PLAIN;//ラベルのフォントで使うスタイル
JMenuItem itemMonospaced = new javax.swing.JMenuItem("Monospaced");
JMenuItem itemSerif = new JMenuItem("Serif");
JMenuItem itemSansSerif = new JMenuItem("SansSerif");
JMenuItem itemBOLD = new JMenuItem("BOLD");
JMenuItem itemITALIC = new JMenuItem("ITALIC");
public TestMenuFrame(){
this.setDefaultCloseOperation(JFrame.DISPOSE_ON_CLOSE);
this.container = getContentPane();// Frameに入れる入れ物取得
this.lbl1.setOpaque(true);//ラベルを「不透明な」設定にします。
this.lbl1.setBackground(new Color(100, 255, 100));//ラベルの背景色設定
this.lbl1.setFont(new java.awt.Font(fontFamily, fontStyle, 20)); //フォント設定
container.add(this.lbl1, BorderLayout.CENTER);//ラベル追加
//メニュー設定
JMenuBar menuBar = new javax.swing.JMenuBar();
this.setJMenuBar(menuBar );
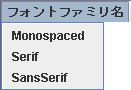
JMenu menu1 = new JMenu("フォントファミリ名");
menuBar .add(menu1);//メニューバーにメニューを追加
menu1 .add(this.itemMonospaced );//メニューにメニュー項目を追加
menu1 .add(this.itemSerif );
menu1 .add(this.itemSansSerif );
JMenu menu2 = new JMenu("スタイル");
menuBar .add(menu2);//メニューバーにメニューを追加
menu2 .add(this.itemBOLD );//メニューにメニュー項目を追加
menu2 .add(this.itemITALIC );
//メニューイベントの追加
this.itemMonospaced.addActionListener(this);
this.itemSerif.addActionListener(this);
this.itemSansSerif.addActionListener(this);
this.itemBOLD.addActionListener(this);
this.itemITALIC.addActionListener(this);
//初期表示
this.setBounds(0, 0, 240, 180);
this.setVisible(true);
}
上記では、まずクラス変数としてJMenuItem を
用意して、各メニュー項目の文字列で生成しています。
そして、メニューバー(JMenuBar menuBar )を生成し、
フレームにsetJMenuBar メソッドで設定しています。add でJMenu オブジェクトを
追加します。JMenu オブジェクトには、
JMenuItem の各メニュー項目を、
add メソッドで追加しています。
JMenu menu1 = new JMenu("フォントファミリ名");
menuBar .add(menu1);//メニューバーにメニューを追加
menu1 .add(this.itemMonospaced );//メニューにメニュー項目を追加
menu1 .add(this.itemSerif );
menu1 .add(this.itemSansSerif );
JMenu menu2 = new JMenu("スタイル");
menuBar .add(menu2);//メニューバーにメニューを追加
menu2 .add(this.itemBOLD );//メニューにメニュー項目を追加
menu2 .add(this.itemITALIC );
以上で、メニューの表示は可能になります。後はメニュー項目をマウスなどで、クリックした場合の
処理ですが、JMenuItem もボタンと同じように、
ActionListener インターフェイスを
implements したオブジェクトを、addActionListenerで設定し、そのインターフェイスの
actionPerformedメソッドを実行することができます。変更 できます。)
サブメニュー
上記メニュー構築プログラム部分を、少し変更してメニューの中にメニューを作れます。メニューバー(menuBar) にメニュー(menu2)を追加する代わりにメニュー(menu1) にメニュー(menu2)を追加する次のコードです。セパレータ も追加(addSeparator()メソッドで )しています。
//メニュー設定
JMenuBar menuBar = new javax.swing.JMenuBar();
this.setJMenuBar(menuBar );
JMenu menu1 = new JMenu("フォントファミリ名");
menuBar .add(menu1);//メニューバーにメニューを追加
menu1 .add(this.itemMonospaced );//メニューにメニュー項目を追加
menu1 .add(this.itemSerif );
menu1 .add(this.itemSansSerif );
menu1 .addSeparator();//メニューのセパレータ追加
JMenu menu2 = new JMenu("スタイル");
menuBar .add(menu2);//メニューバー にメニューを追加 menu1 .add(menu2 );//メニュー にメニューを追加
menu2 .add(this.itemBOLD );//メニューにメニュー項目を追加
menu2 .add(this.itemITALIC );
←上記変更プログラムの実行を確認するボタンです。
チェックボックスメニュー項目(JCheckBoxMenuItem)の利用
選択または選択解除できるメニュー項目を使う場合はJCheckBoxMenuItem クラスを使います。
以下にJCheckBoxMenuItem の継承構造を示します。
java.lang.ObjectJCheckBoxMenuItem
以下で、BOLDと、ITALICのメニューをJCheckBoxMenuItem に変更します。
JMenuItem itemBOLD = new JMenuItem("BOLD");
JCheckBoxMenuItem itemBOLD = new JCheckBoxMenuItem ("BOLD");
JMenuItem itemITALIC = new JMenuItem("ITALIC");
JCheckBoxMenuItem itemITALIC = new JCheckBoxMenuItem ("ITALIC");
そしてイベント処理ですが、これまでの排他制御ではなく、チェックが付いていれば有効にする処理に変更します。
次のようなビットOR の処理に変更します。
なお、チェックされいるかはisSelected()
public void actionPerformed(ActionEvent e)
{
Object obj = e.getSource();
if(obj == this.itemMonospaced){
this.fontFamily = "Monospaced";
} else if(obj == this.itemSerif){
this.fontFamily = "Serif";
} else if(obj == this.itemSansSerif){
this.fontFamily = "SansSerif";
} else if(obj == this.itemBOLD){
fontStyle = Font.BOLD;
} else if(obj == this.itemITALIC){
fontStyle = Font.ITALIC;
}
this.fontStyle = Font.PLAIN;
if(this.itemBOLD.isSelected() ){
this.fontStyle |= Font.BOLD;
}
if(this.itemITALIC.isSelected() ){
this.fontStyle |= Font.ITALIC;
}
this.lbl1.setFont(new java.awt.Font(this.fontFamily, this.fontStyle, 20)); //フォント設定
}
←上記変更プログラムの実行を確認するボタンです。
JAppletでの使用
次のように、JAppletでもJFrameと同じような構造で、
メニューを作ることができます。extends JFrame JApplet の変更だけです
以上の各プログラムを確認したらこのボタンをクリックください。→